Tuesday, January 31, 2012

Smorgasblog and the Big Move

I named this Blog Smorgasblog because it is a mixture of things that have occurred over the past week. It started off with a birthday, yes, mine, which was truly no big deal, but surprisingly was a celebration with wonderful friends that wanted to do something for me. (thank you Mary, Autumn, Lu, Janie, Cheri & Paul) I felt very loved this birthday and that is always a good thing. My one friend has been so taken by my blog header design that she fashioned  a cake to look like it.

This is my Faded Pink Rose cake! Thank you Cheri!

One thing that I had to get done in all this was to get my belongings from storage which was 3 hours away from me. It has also been an added expense. I received some birthday money from very thoughtful friends and was able to finally make the MOVE. Just so you know, when I say I need to move, people run and scatter like it is a showdown in dusty old western saloon town in the desert, complete with rolling tumbleweeds. I have a lot of stuff. I am an artist, a re-purposing artist, a recycle person. I tend to keep everything, but let me clarify that I am not a Hoarder by any means! I will eventually make something out of it!  Needless to say, I don't have too many volunteers when it comes time to move my stuff. Lucky enough, I have a very wonderful person who helped me move out of my house a year and a half ago and was aware of my large amount of stuff. He knows what I had and was brave and not afraid to face this challenge head on, once again.

 We had to rent a 26 foot truck with a lift gate.
 It doesn't look too scary here....

 We can almost see the back of the 30 foot storage unit.
 Lots of interesting things!
Just a little ole piano. It took the two of us 6 hours or so to load it all. Near the end my friend Heidi showed up to help.
 We lost our light, but kept packing. Thank you Heidi! & Bob!

Here is Greg the Truck Driver, which he made me refer to him as the entire 3 hour drive. He really took control of that 26 footer and got everything home in one piece! We kept singing the song "BJ Mckay and his best freind Bear, Honk Honk!" from the 1978 sitcom about a truck driver and his pet monkey. I guess I played the part of the monkey, ooh ooh....

 See the resemblance?

We didn't get home until 10 at night so we rested and started to unload Sunday morning.
 Next morning my super neighbor Richard was thinking of going for a run and lifting weights and saw us moving things and decided it would be a better workout to move things instead. Thank you Richard!

Not much left here, but where to put it all? This house is smaller than my previous house.
 Well, all the chairs did fit on the porch....

It is done, all my stuff is here and it is time to put things into place. A special thanks to all my friends that helped make this possible. I am one step closer to completing the house project and the making of this home. Thank you, thank you, thank you!!! Love you all!


Sunday, January 22, 2012

Halo Mural in Black & White


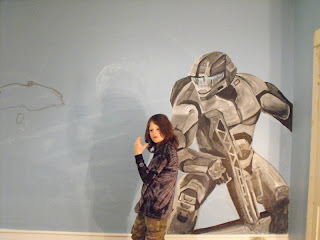
The next step here is to block in the dark & light values. I am simply using black & white paint and some gray tones. This will help give the mural dimension and depth. I don't have to get too caught up on the details here, but I can play with the overall idea with black, white and variation of grays to give me the basic design.


 No need for color just yet, it will come after the value painting is in good shape.
 Hudson has to get in on the action.
 I asked him to place the gun details, cause that is not my forte.

 His assistant is front and center!
 He is doing a great job.
 Coming together, complete with his #1 fan!
 I can tweak things from this point, but at least my road map is there as a guide to bring the mural to life!


Thursday, January 19, 2012

Mural Mural on the Wall

The walls are ready for the Mural! First let me tell you that our heater ran out of oil and we have no heat. It is about 40 degrees in the house, but don't worry the oil is being delivered tomorrow.
                                                     The Show Must Go On!
That is why I am in a hat & gloves, not because that is my Artistic Getup!

Hudson loves the Halo video game and he wants that to be the theme of his room. I am more of a rose painter, but hey, what's the difference between flowers and a big Halo Army guy to paint? Paint is paint! I will take you through my steps of how I go about planning out and painting a mural. Try to keep up!

 First, we had to pick just the right picture from the game and this was approved by Hudson and I liked the blue background which would work in his room.
 This is a short cut for getting my shapes down. I just placed the paper right over the computer screen to outline my image. Any good artist needs a good reference. When you are going to enlarge your image onto a wall, this will help.
 It will look something like this. No details needed yet, so don't worry if your drawing is sketchy.

 To the Wall.... I draw what I call a grid. I draw it on the paper and on the wall. The grid will help place my objects in a correct composition from my smaller image.
 Notice the squares on the paper. I will use these as guides when I draw it on the wall. For example, see the planet shape, it is in the middle grid towards the left a little. I will place it in the same grid on the wall.
 It was hard to photograph, but I used a white charcoal pencil to lightly sketch my layout. It is easy to wipe off or modify. You can use chalk too. I don't want to use pencil because it can bleed into my paint.
I used a light white wash outline with paint to strengthen my images so I can get a spacial view of the mural.
 I can tweak the design and get the right proportions at this point. I don't want to lay down any heavy paint just yet, until I have my perfect drawing. That's as far as I got. Stay tuned.......


Tuesday, January 17, 2012

Just Try


There has been steady work going on in Hudson's room the past few weeks. Walls have been spackled, sanded re-spackled, sanded some more. Between the ceiling boards and windows, there have been at least 6 tubes of caulk applied to seal up holes and imperfections. It is an easy task, but holding a caulk gun over your head for hours upon hours and running your finger down the lines to push it in place is quite daunting.

Today I wanted to write a message about trying to do something, even if you don't know how. I grew up in a family where we always tried to do a task even if we didn't know how and we always did work for ourselves rather than hire someone, as in a construction worker, or seamstress, or painter. My parents always did the job themselves and they instilled that in me. Maybe I would have figured it out myself, but growing up building a house and buying homes that needed repair exposed me to a way of living that made me self sufficient in the ways of home repair. I may not know how to do everything, I am not a carpenter or an electrician, but with some decent instructions, I will give it a heck of a try.

 Ceiling Fan install, took a while, but I did it! I didn't give up and I had confidence in myself!
The pink tools & tape helped keep me motivated! (thanks Autumn).

I encourage you to try something new that you didn't think you could even possibly do. The rewards are great and you will save money doing it yourself and feel so proud of our work. I plan to instill these qualities in my children and hope they appreciate them as I do of my parents. Happy Trying!


Monday, January 2, 2012

More Tea for 2012


I wanted a simple resolution that meant something more...Health is Wealth. I read that statement on the bottle of my vitamins and thought about it...I want to stay healthy over all other wishes. So, I thought, I have always wanted to kick the caffeine and skip the coffee, but I love warm drinks in the morning. Tea! That is the answer, more Tea! I hope I can stick to it, as it will be a change for me. A dear friend was listening when I was muttering these ideas out loud one day and gave me a darling Tea Pot for Christmas. I plan to put it to good use!


A slow down in process, but yet, still there is progress. With the Holiday season we slowed a bit on the home improvement, but still did a little work on the upstairs bedroom we will call 'Hudson's Room'.  Soon, you will get to see a mural progression, but for now, we are just trying to get it under brush....which requires a lot of behind the scenes work.

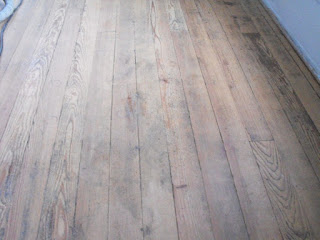
 At first, we had to sand the floors, well...let me back up, I did make a mistake of sequence. I wanted to paint the walls and ceiling so bad that I started painting, then when I went to sand, it went EVERY where, so I had to halt the painting. My advice, sand floors first before painting walls. Clean up is a bear!
 Look at the dust that is coming off the belt sander. It took 20 sanding pads to do the floor and hours of strenuous hand sanding on our hands and knees. My Mom,  my daughter and myself all took turns on this. Our obliques are kickin!
 The soon to be mural wall. Remember, this was the WALLPAPER room you saw before! The transformation is amazing!

 The fireplace wall is covered and leveled. We will use some crown molding at top to close up the uneven gaps at the top.
 Let me hear you say, "WOW"! Yes, that is the after of the floor sanding. It still needs stained and sealed, but WOW!!!!! 100 year old pine floors, nothing compares!
 I will be drinking Tea while gazing upon this room as it develops into a masterpiece! Stay tuned for the Mural!